Build a Microscope
One of the projects I built as a teenager was a simple microscope with a power of about 100X magnification.
A microscope consists of two compound lenses separated by about 6" to 10". The objective lens located at the bottom of the tube provides most of the magnification of the microscope. This focal length of this lens is only a few millimeters to a fraction of a millimeter. The eyepiece lens has a power rating of 5X to 20X which translates to a focal length of 2" to .5" (50mm to 12mm). Compound lenses (IE: a lens system made up of several elements or individual lenses) are used instead of single elements to correct for color and field flatness. If a single element lens is used for the objective the image will show colored fringes because the simple lens cannot bring all colors of light to focus at the same point. If a single element lens is used for the eyepiece there may be curvature of the image field.
The microscope I built as a science fair project used simple lenses and therefore had the problems of image color and narrow field of view. But it still showed me the structure in leaf cells and in blood. Today you can buy surplus objectives and eyepieces on line, but when I built mine I made do with 'improvised' lenses. My eyepiece was a viewfinder lens salvaged from a broken camera The objective lens was a MacGyverism. Here I used a small, short focus lens from a #222 penlight bulb. I carefully broke the bulb and used a small file to remove all the extra glass left by the lens portion of the bulb. A thimble was used to house the objective. A hole just smaller than the diameter of the objective lens was drilled into the end of the thimble and the lens was glued over the hole using the smallest quantity of 'super glue' possible.
I used a homemade cardboard tube about 6" long to mount the objective and eyepiece lenses. A brass or aluminum tube from the hobby shop will make for a 'finished' look. Also consider a tube from a dead magic marker pen, a cigar tube (from a fancy cigar), or a piece of electrical tubing cut to length. Paint the inside of the tube flat black to increase contrast in the images. I made the body of the microscope and the stage out of wood. The optic tube rested against the support post of the microscope and was held in place by a rubber band. Focusing was accomplished by sliding the tube up and down by hand. The more adventurous could rig up a rack an pinion system. Surplus Shed and Small Parts have parts for this.
#222 Penlight bulb used as a source for the objective lens
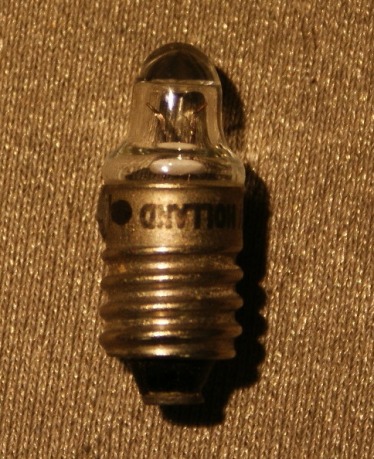
The lens for my microscope objective came from a #222 penlight bulb. You can see the lens at the front of the bulb. (Some cheap Chinese imported bulbs have the same shape bulb outline without the lens). The bulb can be carefully broken open using pliers and the lens portion salvaged. The lens will then be glued over a hole made in a thimble to house the objective.
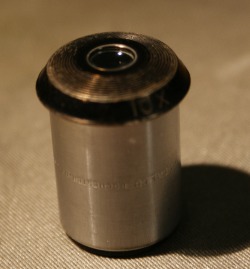
The eyepiece can be a simple lens with a focal length of about 1" (25mm), a mounted or unmounted 10X magnifier or you can get a surplus microscope eyepiece. In any case the eyepiece shouldn't cost more than about $7 or so. Surplus optics can be found at Surplus Shed.
Surplus 10X microscope eyepiece.
More construction photos to come.
